Earth Shelter Design Considerations
Click here to find out more about the complete,
detailed, Earth Sheltered Home Design Manual.
One of the major reasons the alternate energy project has been so successful is because of the efficient design of the earth sheltered home. My purpose in including this section is to provide you with information concerning the basic design and construction of passive solar, earth shelter homes. There are several excellent books dealing with the specifics of earth sheltered design and construction and I strongly urge you to consult one of them prior to beginning a project of this magnitude. Additionally, building codes differ throughout the country and you must determine which codes apply to your area. If necessary, you may have to apply for a variance.
Solar Orientation
One of the most critical steps in the development of a passive solar, earth sheltered home, is its proper orientation to the sun. If at all possible, select a site that has a sloping, southern hillside. For efficient use of the energy form the sun, the solar collectors must face no more than 20 degrees east or west of solar (true) south. In my case, the property I selected had a steep hillside facing east, which is not an ideal layout. However, the property also had a substantial creek that I wanted for my hydroelectric experiments, so we bought it. The site required extensive excavation in order to allow for an effective solar layout. Of course, I struck rock in the back corner of the excavation and we were forced to blast, several times in fact. This added an additional $2500 to the cost of the project and the footings had not even been poured. Remember Murphy?
Solar South
In order to determine the proper orientation of your solar home, you must determine solar south. There are at least two ways to find solar south. The first method is with a compass and the second method is by determining solar noon.
A compass will tell you which direction is south. But remember, this is magnetic south, not true south. You must take into account magnetic declination. This is the number of degrees that true north is away from magnetic north. In some parts of the country there is no appreciable difference. However, in many areas, there is a significant deviation.
I prefer the second technique. This method is simple, reliable, works in any part of the country, at any time of the year, and does not require a compass! This method is based on the determination of solar noon. In order to calculate solar noon in your area, first find out the times for local sunrise and sunset. Next, calculate the number of hours and minutes between sunrise and sunset and divide by two. Finally, add that time back to the time of sunrise. The time you have calculated is the exact time that the sun will be due south.
Lets look at an example. Suppose you check the newspaper or the local news on television (usually sunrise and sunset times are given during the weather) and discover that sunrise is at 7:35 and sunset is at 6:15. Add 12 hours to the sunset time, think of it like a 24 hour clock. So 6:15 becomes 18:15. Next, you must subtract the sunrise time from the sunset time. 18:15 - 07:35 =10:40 Now, divide the 10:40 by 2 and add this back to the sunrise time. 10:40 / 2 = 5 hours and 20 minutes; 07:35 + 5:20 = 12:55 PM
Now that you have determined solar noon, lets see how to apply the information. Get two stakes about three feet tall and drive one of them into the ground prior to solar noon. Locate this stake where you plan to build the front of your home. At exactly solar noon, drive the second stake into the ground at the head of the shadow cast by the first stake. A string tied between the two stakes will provide you with a north/south axis. A line perpendicular to the original north/south axis will give you the desired southern exposure.
In applying this method, once I had established the southern exposure, I rotated the layout of the house 15 degrees to the east of due south. This provided a little more morning sun and helped block out some of the hot, late afternoon sun. You can alter the layout of your home by 20 degrees either east or west of due south and experience only about a 10% reduction in solar gain.
Sun Angles and Shading
During the winter months the sun will be very low on the horizon. In fact, on December 21, depending on your location, the sun may only be about 20 degrees above the horizon. It is important that your yard contain no trees that would obstruct the sun during the best hours for solar gain from nine o'clock in the morning until about three o'clock in the afternoon. During the summer some means must devised to block the sun. A properly sized overhang is the answer to the summer shading problem. The overhang must be long enough to block the summer sun, yet short enough to allow the winter sun to fall on the floor.
he required length of an overhang can be determined using the following formula:
OH = WH / FWhere: OH is the overhang length
WH is the window height or opening
F is a factor that takes into account your north latitude and whether or not you desire full shading at noon on June 21 or August 1
Latitude (in degrees)..................................................F
26.........................................................................5.6 to 11.1
32.........................................................................4.0 to 6.3
36.........................................................................3.0 to 4.5
40.........................................................................2.5 to 3.4
44.........................................................................2.0 to 2.7
48.........................................................................1.7 to 2.2
52.........................................................................1.5 to 1.8
56.........................................................................1.3 to 1.5
The F Factor with the highest value for your north latitude will provide full shading at noon on the 21st day of June, while the lower of the two F Factors will provide full shading on the first of August. Additionally, keep in mind that these calculations assume the structure is facing due south. If you have situated your home 15 degrees east or west of due south you may wish to lengthen the length of the overhang by 10% to ensure proper shading.
For example, at a north latitude of 36 degrees, the F Factor would be 3.0 to 4.5. The window in this case is actually a sliding glass door with a height of about 6 feet 8 inches (or 6.8 feet).
Jun 21: 6.7 / 4.5 = 1.5 feet
Aug 1: 6.7 / 3.0 = 2.3 feet
Lets consider the position of the sun. On June 21 the sun is at its highest point in the summer sky. An overhang of 1.5 feet will provide complete shading on this day. However, in many areas this marks the beginning of the summer cooling season. You may wish to use the longer overhang length to provide additional shading until August. After the first of August the sun will slowly begin to shine on the floor.
Site Should Determine Design

You will find that it much more economical to find a site and then design your house to fit the site, rather than attempting to fit the site to a specific design as I did. Since the property I purchased lacked a southern hillside, I was forced to excavate a very large area to accommodate the south facing house and a front yard. In fact, parts of the yard were actually 15 underground before I started digging. If your property has a steep southern slope, a long narrow home that is designed to be parallel to the slope will require the least amount of excavation. A two story design might be practical in such a situation.
Footings
Now that you are ready to think about excavating the area for the house and digging the footings it is a good time for me to remind you to check and determine what building codes apply in your area. Requirements will vary form state to state and even from county to county within each state. Many counties will require that a building official inspect your site prior to concrete being poured. Additionally, there may be electrical and plumbing inspections required.
In my area, since I was not going to use commercial electricity, the only inspections that were required concerned the sewage disposal method; in this case, a traditional septic tank system. After the 750 gallon tank (suitable for a one bedroom house, regardless of the number of bathrooms) was installed and the field line excavated, the inspector came out and blessed the installation. I suggest that you involve the inspectors every step of the way. Building codes are designed to ensure our safety; however, you may run into some problems because the codes are often not up to date when it comes to special structures such as earth sheltered homes and you may have to apply for a code variance. Being on good terms with the building inspectors never hurts in such a situation.
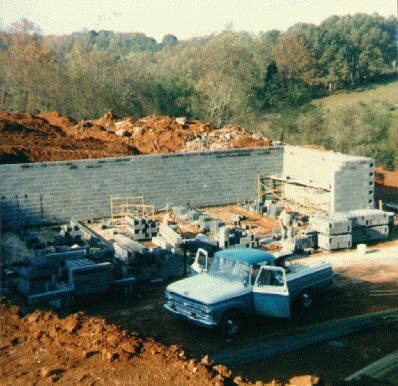
Any home that has problems with the foundation will have problems all during construction. An earth sheltered home is no exception to this rule. In a typical above ground home, the footings do little more than provide a stable and secure place on which to build. In an earth sheltered home the foundation must carry and distribute a load of tons of concrete and soil. One yard of concrete weights about 2 tons, so the 120 yards of concrete my home required weights about 240 tons. Add to that the 11 tons of rebar and the weight of hundreds of cinder blocks and you have quite a load for the foundation to carry. The subcontractors I hired to lay the block commented that they had never seen so much concrete and steel in a private home!
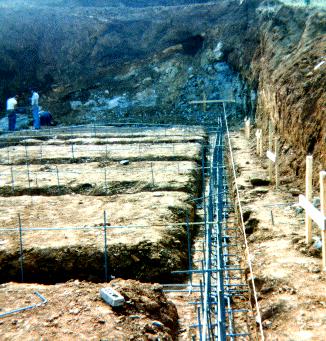
The footings must carry the entire weight of the building. In my case the footings are 24 inches wide and about 18 inches deep. They are reinforced with #4 rebar. At this point, let me emphasize that soil conditions differ throughout the country and you should check the conditions on your property and then consult with an expert before you begin construction.
n order to determine how much concrete you will need, you must calculate the volume of the footings. Lets assume that the footings are 24 inches wide, 18 inches deep, and total 200 feet in length. First, convert everything to feet. So 24 inches becomes 2.0 feet and 18 inches is 1.5 feet. Now, to find the volume start multiplying.
2.0 X 1.5 = 3.0
3.0 X 200 = 600 cubic feet
Since concrete is sold by the cubic yard, you must divide the 600 cubic feet by 27. (A cubic yard is 3 feet times 3 feet times 3 feet or 27 scubic feet.) This gives you 22.2 yards of concrete. In East Tennessee, a typical price for the 2500 PSI concrete used in the footings was about $50 per yard.
The specific layout of the rebar is critical and will depend on the design of your home. You should consult an expert concerning how your rebar should be arranged in the footings, walls, and roof. In most cases, the company you purchase the rebar from can provide the engineering specifications for you. In my case, the design required that #4 (1/2") rebar be used in the footings. Two rods were placed approximately 18 inches apart throughout the entire length of the footings. Fragments of bricks or a similar material must be used to keep the rebar off of the bottom of the footing. Additionally, lengths of rebar were placed on 16 inch centers and wire tied to the rebar running lengthwise in the footings. These vertical starter bars are made from 3/4" rebar that is about 3 feet long and bent to allow about 20" of rebar to extend above the footings. These starter bars must be aligned so that the cores of the blocks will fit over them, so make sure that you make accurate measurements. The starter bars tie the walls to the footing.
It was long about this time that Mr. Murphy paid us another visit again. The footings were dug and the rebar was in place and I was ready for the first load of concrete. The problem was that my bridge wasn't ready. A few days earlier, the owner of the concrete company came by to take a look at out project. We were going to need over a hundred yards of concrete, so he was curious. I also told him that I wanted him to look at a bridge to make sure his trucks could cross it without any problems. He said he had two sizes of trucks, one held eight yards and the other held ten yards.
The infamous bridge is actually a bit small for the volume of Fall Creek. With only moderate rainfall the creek will flood over the bridge. The bridge was made of two 39 inch concrete tiles placed side by side with mortared walls and a concrete cap to drive on. Bulldozers, dump trucks, and well digging equipment had all passed over the bridge in the past six months. The first concrete truck over the bridge was brand new and was the pride of the fleet (carrying something like 13 yards of concrete) and the bridge cracked like an egg shell and collapsed around the tiles just as the truck passed over it.
After pouring its load of concrete in the footings we piled rocks and rubble back around the tiles and the empty truck passed over the bridge without a problem. The second load of concrete arrived just after the bridge collapsed. It was ours and I had to do something with it or be charged a dumping fee. So after the first truck was safely back across the bridge, we quickly built a form, tied some #4 rebar together, and dumped the next eight yards of concrete on the bridge. We poured the rest of the footings about a week later.
Walls
After the concrete in footings has been allowed to cure for a few days (it actually takes 28 days for concrete to reach its full compressive strength) you can begin to lay block. The shell of my 2000 square foot home went up rapidly with the crew of masons I hired. We used 12 inch block along the exterior walls and retaining walls and 8 inch block for the front (exposed) wall and all interior walls. All block walls were laced with #4 rebar on 16 inch centers and placed in the groves of the blocks of every other layer as per the specifications. Each block was eventually filled with concrete.
Roof
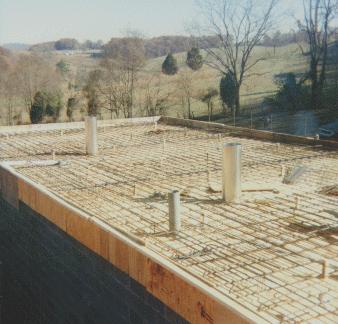
With a fully underground home, such as mine, the roof slab will likely have to be about 12 inches thick. The slab should have a slope of about 1/8 of an inch per foot to allow for proper drainage. Different floor plans will require different layouts for the rebar and again this should be left to a professional. In addition to waterproofing, insulation, and drainage material, the roof slab should support at least two feet of soil. This amount of soil will allow grass and small ground cover plants to grow. Small shrubs require at least 36 inches of soil.
Construction costs can be reduced significantly if you use a conventional truss roof system instead of concrete slab and earth cover. A conventional roof insulated to an R-60 (or more depending on your location) will provide about the same degree of energy efficiency as a fully earth sheltered home. In this case, you would use an earth berm to just under the eve of the roof.
We decided to build the walls, and complete the roof slab before we poured the floor slab. By doing this, the walls and the roof would be filled with concrete in one continuous pour. To lift the tons of concrete to the roof required a machine called a concrete pump. The nearest concrete pump large enough to do the job was located in a town almost 75 miles away. The machine and operator cost $95 an hour, with a four hour minimum.
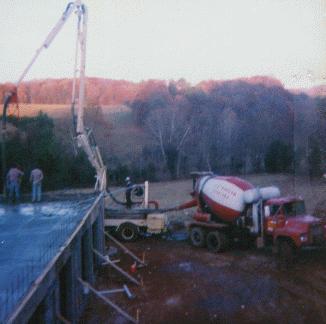
This time Murphy was driving the first concrete truck. When the truck got to within 100 feet of the house, it ran out of fuel blocking the driveway! Murphy's brother was driving the next truck. When the next truck arrived a few minutes later, the driver with lighting like speed assessed the situation and pulled his concrete truck weighting thousands of pounds off of the driveway and into a field made soft by the fall rains. Within minutes he was mired up to his axles in mud!
Two hours later and with the help of a bulldozer, the first truck was pulled the last few feet to the concrete pump and we were finally able to begin to pour the walls and the roof slab. It took almost another hour to drag the second truck from the field. The pasture next to the house still bares the scares of that battle.
Floor Slab
We began by pouring a layer of course sand four to six inches deep over the entire area. The sand provides drainage and acts as a cushion for the slab as it settles. We laid all of the sub-floor services such as the air vents, plumbing pipes, and electrical conduit into the sand. Make sure that you test everything personally! After the floor slab has been poured its too late to discover that a circuit is dead, or a water line has been omitted.
I also suggest that you place a one inch thick piece of extruded polystyrene on the sand so that it extends from the front of the house inward at least two feet. This serves to help insulate the floor slab from the cold at the front of the house. Once the rough-in was complete, we smoothed out the sand and place a plastic vapor barrier over it. The reinforcement for the slab consists of #10-10, (6" by 6") welded wire mesh. Take care not to damage the vapor barrier during this step. Don't forget to allow for expansion joints around the perimeter of the floor slab. Finally, pour the floor slab using a 2500 PSI mix.
A Lesson Learned The Hard Way
If you hired contractors for the large jobs, as I did, you must still watch over them carefully. You must stay personally involved at all times. Even though I was on the job site almost every day, I still missed a few things. Let me give you some examples: First, my contractor forced underground, copper shielded, telephone cable, through half inch conduit, (please don't ask me how) and damaged the wire in the process. The result is that now my phone lines run under baseboards because I can't get the damaged wire out. He also used the same wire for my television antenna cables, and guess what; they don't work either. Also, one electrical circuit is dead and he didn't have a clue as to how he should have wired a two way switch in a hallway. The day before I poured the floor slab he assured me, with his best poker face, that all circuits tested out fine! Of course, as I was to discover later, no two light switches are the same distance from the floor, but that is a minor point.
Lets talk about floor vents. His instructions were simple. Bring the vents into the rooms along the edge of the walls and secure them with a piece of rebar. He took it upon himself to place the vents two or three feet from the walls so that in his words "they would not be covered by furniture." In and of itself, that's not a bad idea, but he did not check the floor plan to see where future internal wooden stud walls would be and he placed four vents directly in front of doors to the various rooms. As the concrete was being poured, I spotted this and managed to save two of the locations by moving them myself.
Before I hired him I reviewed his work. You see he had designed and built a beautiful earth sheltered home for his family.
 Please click the return button only if you entered this page from a search engine and do not see a menu at the left of the page.
Quest Enterprises specifically disclaims any warranty, either expressed or implied, concerning the information on these pages. We will have no liability for loss, damage, or injury, resulting from the use of any information found of this, or any other web page we have created.
Quest Enterprises®
5840 Brights Pike
Russellville, TN 37860
Copyright ©1996 - 2010 All Rights Reserved
![]()